If you love cheesecake but want a healthier, high-protein alternative, you’re in the right place. This protein cheesecake recipe is not only easy to make but also delicious, low in sugar, and packed with protein, making it the perfect guilt-free dessert.
Whether you’re looking for a post-workout treat, a weight-loss-friendly dessert, or just a macro-balanced sweet option, this cheesecake will satisfy your cravings without derailing your fitness goals. Plus, it’s made with simple, wholesome ingredients like Greek yogurt, protein powder, and natural sweeteners.
In this guide, I’ll show you how to make the best protein cheesecake, including ingredient swaps, baking tips, and variations to fit your dietary needs. Get ready to enjoy a creamy, rich cheesecake that’s both healthy and indulgent.
Why Choose Protein Cheesecake?

If you love cheesecake but want a healthier option, protein cheesecake is the perfect alternative to traditional cheesecake. It has the same creamy texture and delicious flavor but with added nutritional benefits. Unlike regular cheesecake, which is often high in sugar and unhealthy fats, protein cheesecake is made with wholesome ingredients like Greek yogurt, cottage cheese, and protein powder.
Health Benefits of Protein Cheesecake
Protein cheesecake is packed with nutrients that make it a better choice than traditional cheesecake.
- High in protein, which helps with muscle recovery, satiety, and overall health
- Low in sugar, making it a better option for those watching their sugar intake
- Lower in calories compared to regular cheesecake, making it ideal for weight management
- Often includes probiotic-rich ingredients like Greek yogurt, which supports digestion
A Perfect Dessert for Fitness Enthusiasts
For people who exercise regularly, having a nutritious post-workout snack is important. Protein cheesecake provides a way to satisfy sweet cravings while also fueling muscle recovery. Instead of reaching for a high-sugar protein bar, you can enjoy a homemade dessert that fits into a healthy diet.
- Helps replenish protein stores after a workout
- Provides a balanced mix of protein, healthy fats, and carbs for energy
- Satisfies cravings without derailing health and fitness goals
Diet-Friendly and Versatile
One of the best things about protein cheesecake is how easily it can be adapted to different dietary needs. Whether you’re following a specific diet or just want a healthier dessert, there are many ways to customize the recipe.
- Keto and low-carb versions use almond flour and sugar-free sweeteners
- Gluten-free versions use oat flour or almond flour instead of traditional crust ingredients
- Vegan options replace dairy with plant-based yogurt and protein powder
- Different flavors can be added, such as chocolate, fruit, or peanut butter
With so many options, protein cheesecake is a great way to enjoy a delicious dessert while keeping nutrition in mind.
Essential Ingredients for Protein Cheesecake
A great protein cheesecake starts with high-quality ingredients that provide the perfect balance of creaminess, protein content, and sweetness. Let’s break down each essential ingredient, along with substitutions and recommendations to suit different dietary needs.

Protein Source
The key to making cheesecake high in protein is selecting the right protein source. Here are some great options:
- Whey protein powder is a popular choice for a smooth, creamy texture. Vanilla or unflavored whey works best for cheesecake.
- Casein protein powder absorbs more liquid, creating a denser, richer texture—ideal for a thick cheesecake.
- Plant-based protein powder, such as pea or soy protein, is a good alternative for a vegan or dairy-free option. Some plant proteins can make the texture slightly grainy.
- Greek yogurt or cottage cheese naturally adds protein while contributing to a rich and creamy texture.
If using protein powder, choose a brand that mixes well and doesn’t clump, as some protein powders can make the cheesecake dry or chalky.
Creamy Base
A traditional cheesecake uses cream cheese, but for a lighter and healthier version, these alternatives work well:
- Low-fat cream cheese provides a balance between traditional taste and a lighter alternative.
- Greek yogurt, whether full-fat or low-fat, adds extra protein while maintaining a creamy consistency.
- Cottage cheese, when blended smooth, is lower in fat but still creates a rich, protein-packed base.
- Dairy-free alternatives, such as coconut cream, cashew cream, or almond-based cream cheese, work well for a vegan cheesecake.
If using cottage cheese, blending it well removes lumps for a smoother consistency.
Natural Sweeteners
Since traditional cheesecakes contain a lot of sugar, here are some healthier alternatives:
- Stevia is a natural, zero-calorie sweetener that blends well into cheesecake batter.
- Erythritol and monk fruit sweeteners are low-carb and keto-friendly substitutes that mimic sugar’s sweetness without the calories.
- Honey or maple syrup offer a more natural option, though they are higher in calories and carbs, making them better for non-keto versions.
- Mashed banana or applesauce can add natural sweetness while keeping the cheesecake moist.
The amount of sweetener needed may vary depending on the protein powder used, as some powders already contain sweeteners.
Crust Options
If you prefer a crust for your cheesecake, here are some healthier alternatives:
- Almond flour crust is a keto-friendly, nutty, and buttery option.
- Oat flour crust provides a slightly chewy, whole-grain base that pairs well with protein cheesecake.
- Crushed graham crackers offer a more traditional taste if you’re not limiting carbs.
- A no-crust option is great for those looking to reduce calories and simplify the recipe.
For a crunchier crust, pre-baking it for five to seven minutes before adding the filling can help.
Flavor Enhancers and Add-Ins
To improve the flavor of protein cheesecake, consider adding:
- Vanilla extract for a richer taste that complements most protein powders
- Lemon zest or juice for a slight tangy balance
- Cocoa powder for a chocolate version of protein cheesecake
- Cinnamon or pumpkin spice for warmth and depth of flavor
- Berries or sugar-free chocolate chips for extra sweetness and texture
Mix-ins like chocolate chips or fruit should be folded in last to keep the batter smooth.
Final Thoughts
The right combination of ingredients ensures a creamy, delicious protein cheesecake that aligns with your dietary goals. Whether you prefer low-carb, gluten-free, keto, or vegan options, you can tweak the ingredients to suit your needs. Let me know if you’d like suggestions on ingredient substitutions for specific diets.
Step-by-Step Protein Cheesecake Recipe

Making protein cheesecake at home is easier than you think. Follow this step-by-step guide to create a creamy, delicious, and protein-packed cheesecake that satisfies your sweet tooth without guilt.
Recipe Overview
| Step | Details |
|---|---|
| Prep time | 10 minutes |
| Cook time | 35-40 minutes (if baking) or 2-3 hours chilling (no-bake) |
| Total time | 45-50 minutes (baked) or 3+ hours (no-bake) |
| Servings | 8-10 slices |
Ingredients You’ll Need
For the Cheesecake Filling
- 1 cup Greek yogurt
- 8 ounces low-fat cream cheese or cottage cheese
- 2 scoops vanilla or unflavored protein powder
- 2 eggs or flax eggs for a vegan option
- ¼ cup sweetener of choice such as stevia, erythritol, or monk fruit
- 1 teaspoon vanilla extract
- ¼ cup unsweetened almond milk or any milk alternative
For the Crust (Optional)
- 1 cup almond flour or oat flour
- 2 tablespoons melted coconut oil or butter
- 1 tablespoon sweetener
Step-by-Step Instructions
Step 1: Prepare the Crust (Optional)
If you prefer a crustless protein cheesecake, skip this step.
- Preheat the oven to 325°F (160°C).
- In a mixing bowl, combine almond flour, melted coconut oil, and sweetener. Stir until the mixture has a sandy texture.
- Press the mixture evenly into the bottom of a lined 8-inch springform pan.
- Bake for 8-10 minutes, then let it cool while you prepare the filling.
Step 2: Blend the Cheesecake Filling
- In a large mixing bowl, add Greek yogurt, cream cheese, protein powder, eggs, sweetener, vanilla extract, and almond milk.
- Use a hand mixer or blender to mix until smooth and creamy. Avoid overmixing to prevent cracking.
- If the mixture seems too thick, add a splash of almond milk to reach the right consistency.
Step 3: Bake or No-Bake Option
Baked protein cheesecake:
- Pour the filling over the cooled crust in the springform pan.
- Place the pan in a larger baking dish filled with hot water to prevent cracking.
- Bake at 325°F (160°C) for 35-40 minutes, or until the center is slightly jiggly.
- Turn off the oven, crack the door open, and let the cheesecake cool inside for 30 minutes.
No-bake protein cheesecake:
- Pour the filling into a parchment-lined cake pan or silicone mold.
- Smooth the top with a spatula and refrigerate for at least 2-3 hours, or until set.
Step 4: Chill, Serve, and Enjoy
- Chill the cheesecake in the refrigerator for at least four hours, preferably overnight for the best texture.
- Carefully remove from the pan, slice, and serve with your favorite toppings.
- Enjoy your healthy, high-protein cheesecake guilt-free.
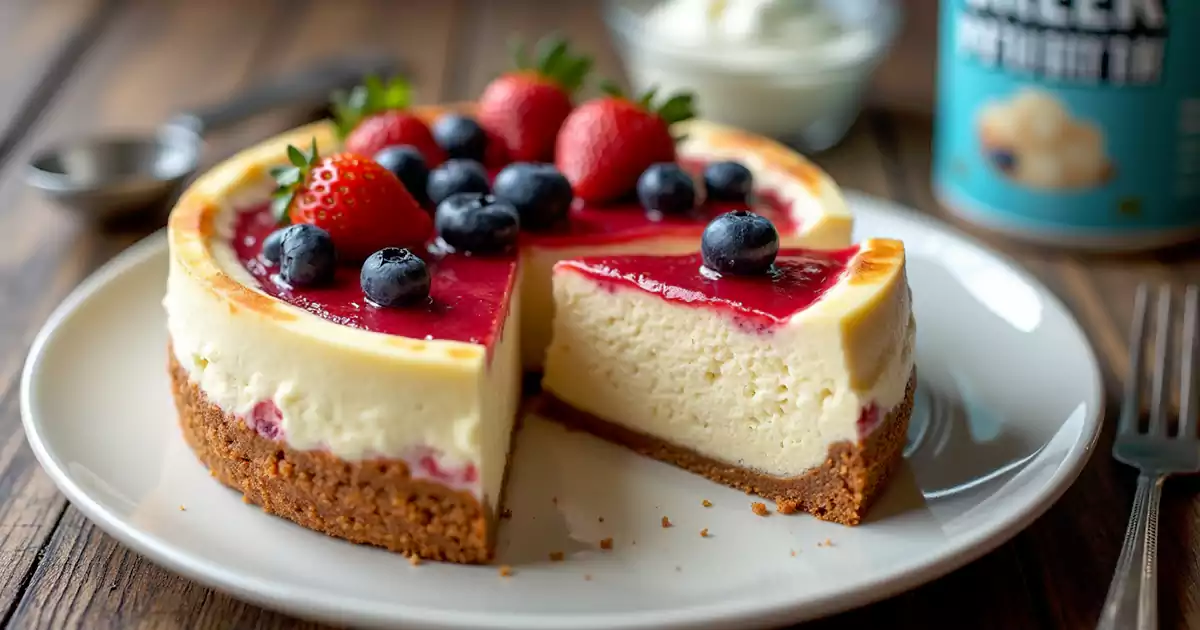
Topping Ideas and Customizations
- Fresh berries such as strawberries, raspberries, or blueberries
- Nut butter drizzle such as almond butter or peanut butter
- Chocolate drizzle with melted dark chocolate or sugar-free syrup
- Whipped cream, either light or dairy-free
- Crushed nuts such as walnuts, pecans, or almonds
By following these steps, you will create a delicious, creamy protein cheesecake that fits into any healthy diet. Whether baked or no-bake, this dessert is a great option for fitness lovers and dessert fans alike.
Tips for the Perfect Protein Cheesecake
Making a protein cheesecake that is creamy, smooth, and full of flavor requires some key techniques. Unlike traditional cheesecakes, protein cheesecakes contain ingredients like protein powder and Greek yogurt, which can affect the texture. Here are some expert tips to help you create the perfect protein cheesecake every time.
Choose the Right Protein Powder
Protein powder is a major ingredient in this recipe, but not all protein powders work the same way.
- Casein protein or a blend of whey and casein creates a creamy texture.
- Whey protein alone can make the cheesecake too dry, so balance it with Greek yogurt or cottage cheese.
- Plant-based protein like pea or soy protein can work, but you may need to add extra moisture with almond milk or coconut cream.
A good option is unflavored or vanilla protein powder for a neutral base, then add flavors like cinnamon, cocoa, or fruit extracts.
Prevent a Dry or Crumbly Texture
Protein powder absorbs liquid differently than traditional cheesecake ingredients. To keep your cheesecake moist:
- Use full-fat or low-fat dairy instead of fat-free options, which can make the texture rubbery.
- Avoid overmixing the batter to prevent excess air, which can cause cracks.
- Bake at a lower temperature, around 325°F (163°C), to avoid drying it out.
- Use a water bath by placing the cheesecake pan in a larger dish filled with hot water to create a more humid baking environment.
If your batter looks too thick, add a splash of almond milk or yogurt to loosen it up.
How to Avoid Cracks in Your Cheesecake
A cracked cheesecake doesn’t affect the taste, but a smooth surface looks more appealing. Here’s how to prevent cracks:
- Remove from the oven when the center still jiggles slightly. Overbaking causes dryness and cracking.
- Let it cool gradually by leaving it in the oven with the door slightly open before transferring it to the fridge.
- Use a water bath to maintain moisture while baking.
If cracks appear, cover them with a protein frosting, Greek yogurt topping, or fresh fruit.
Adjusting Sweetness and Flavor
Protein cheesecakes often use low-calorie sweeteners instead of sugar. Here’s how to choose the best one:
- Stevia and monk fruit are natural sugar-free options.
- Erythritol and allulose provide a sugar-like taste with fewer calories.
- Honey or maple syrup add natural sweetness and extra moisture.
Combining sweeteners, such as monk fruit with erythritol, can create a more balanced sweetness without bitterness.
The Secret to a Rich, Creamy Texture
A great cheesecake should be smooth, thick, and creamy. Here’s how to achieve that texture:
- Blend all ingredients well to ensure even distribution.
- Let the batter sit for five to ten minutes before baking to help flavors develop.
- Chill the cheesecake for at least four hours, preferably overnight, to enhance the flavor and texture.
For an extra creamy consistency, add a small amount of mascarpone or cream cheese to the batter.
Best Baking and Serving Practices
- A springform pan makes removing the cheesecake easier.
- Lining the pan with parchment paper prevents sticking.
- Let it cool fully before slicing to preserve the texture.
- For added protein, top with Greek yogurt, nut butter, or crushed nuts.
Store leftovers in an airtight container in the fridge for up to five days, or freeze individual slices for a quick and healthy dessert anytime.
Storage & Meal Prep Tips

Proper storage is key to keeping your protein cheesecake fresh, delicious, and creamy for days. Whether you’re making it in advance for meal prep or saving leftovers, following these storage and freezing tips will help maintain its flavor and texture.
Storage Tips
| Storage Method | Instructions |
|---|---|
| Refrigerator Storage | Store in an airtight container or wrap tightly with plastic wrap. Keep at or below 40°F (4°C) and consume within 4-5 days. |
| Freezing Whole Cheesecake | Wrap in plastic wrap, place in a freezer-safe container, and freeze for up to 2 months. |
| Freezing Individual Slices | Wrap each slice separately in plastic wrap and foil for easy thawing. |
| Thawing in Fridge | Transfer to the refrigerator and let thaw overnight for the best texture. |
| Quick Thawing | Leave a slice at room temperature for 20-30 minutes. Avoid microwaving to prevent texture changes. |
Meal Prep Ideas
| Idea | How to Use It |
|---|---|
| Mini Cheesecakes | Use a muffin tin for portion-controlled servings. Great for grab-and-go snacks. |
| Custom Toppings | Store plain and add different toppings like berries, nut butter, or dark chocolate daily. |
| Post-Workout Snack | Pair with coffee or a protein shake for a balanced and satisfying treat. |
By following these storage and meal prep tips, you can enjoy your protein cheesecake anytime without compromising taste or texture.
Try out this Protein Cheesecake and let your creativity shine! We’d love to see your sweet creations. Tag us on Instagram at @SweetEatsRecipes and use the hashtag #ProteinCheesecake to get featured.
Protein Cheesecake
Equipment
- Mixing Bowl
- Hand mixer / Blender
- Springform pan
- Oven / Refrigerator
Ingredients
- 1 cup Greek yogurt
- 8 oz Cream cheese
- 2 scoops Protein powder
- 2 Eggs
- ¼ cup Natural sweetener
- 1 tsp Vanilla extract
- ½ cup Almond flour
- 1 tsp Baking powder
Instructions
- Preheat the oven to 325°F (if baking). Grease a springform pan.
- In a mixing bowl, combine Greek yogurt, cream cheese, and protein powder.
- Add eggs, sweetener, vanilla extract, and baking powder. Blend until smooth.
- Pour the mixture into the prepared pan.
- Bake for 35-40 minutes (or refrigerate for 2-3 hours for a no-bake version).
- Let it cool completely before slicing and serving.
Notes
- For a lower-fat version, use low-fat cream cheese and Greek yogurt.
- Adjust the sweetness to taste based on preference.
- Try different protein powder flavors like chocolate or strawberry for variety.