There’s nothing quite like the rich, creamy texture of a homemade blackberry cheesecake. With its buttery graham cracker crust, smooth cream cheese filling, and a luscious blackberry topping, this dessert is the perfect balance of tangy and sweet. Whether you’re making it for a special occasion or just craving a decadent treat, this step-by-step guide will walk you through the entire process.
In this recipe, you’ll learn how to make both a baked and no-bake version of blackberry cheesecake, ensuring there’s an option for every skill level and preference. Plus, we’ll share expert tips on achieving the perfect texture, preventing cracks, and creating a beautiful presentation.
Ready to impress your family and friends with a delicious homemade cheesecake? Let’s dive in!
Ingredients for the Perfect Blackberry Cheesecake
Making a delicious blackberry cheesecake starts with using the right ingredients. Each component plays a crucial role in creating the perfect balance of flavor, texture, and richness. Below is a breakdown of what you’ll need for the crust, creamy cheesecake filling, and fresh blackberry topping.

Crust Ingredients
The crust is the foundation of your cheesecake, adding a subtle crunch that complements the smooth filling. You have a couple of options depending on your preference.
- Graham crackers or Oreo cookies provide a solid base. Graham crackers give a slightly sweet, buttery flavor, while Oreos add a richer, chocolatey twist.
- Unsalted butter helps bind the crust together and adds a rich taste.
- Granulated sugar enhances the crust’s sweetness.
- A pinch of salt balances the sweetness and enhances the overall flavor.
For a no-bake cheesecake, chilling the crust is essential, while a baked version may require pre-baking for a firmer base.
Cheesecake Filling Ingredients
The filling is the heart of the cheesecake, giving it a creamy and velvety texture. Using high-quality ingredients ensures the best results.
- Cream cheese provides the signature creamy texture. Full-fat cream cheese works best for a rich and smooth consistency.
- Granulated sugar sweetens the filling and balances the tartness of the blackberries.
- Eggs help bind the filling and create a firm, custard-like texture in baked cheesecakes. If making a no-bake version, eggs are not needed.
- Heavy cream or sour cream adds extra creaminess and richness. Sour cream also enhances the tangy flavor.
- Vanilla extract provides warmth and depth to the cheesecake’s flavor.
- Lemon zest or juice brightens the flavors and enhances the blackberry topping.
Blackberry Topping Ingredients
The blackberry topping adds a burst of fruity freshness, creating a perfect contrast to the creamy filling. You can make it as a smooth sauce or keep it chunky with whole berries.
- Fresh blackberries offer natural sweetness and tartness. Frozen blackberries can also be used.
- Granulated sugar balances the tartness of the berries.
- Lemon zest and juice enhance the blackberry flavor and add a refreshing citrusy note.
- Cornstarch or gelatin thickens the blackberry sauce, preventing it from running off the cheesecake.
- Water helps create the right consistency for a smooth sauce.
Once prepared, the topping should be cooled before spreading over the cheesecake to maintain its structure. Alternatively, fresh blackberries can be used as a garnish for a more natural presentation.
Having the right ingredients ensures your blackberry cheesecake turns out flavorful, smooth, and visually stunning. Now that you have everything ready, let’s move on to the first step—preparing the crust.
Step 1 – Preparing the Cheesecake Crust
A good cheesecake starts with a solid base, and the crust plays a key role in adding texture and flavor to your dessert. Whether you prefer a classic graham cracker crust or a rich Oreo crust, making it from scratch is quick and easy.

Choosing the Right Crust
The crust provides a slightly crunchy contrast to the creamy cheesecake filling. The two most popular options are:
- Graham cracker crust. This is the traditional choice for cheesecakes. The mild sweetness and crisp texture complement the rich filling without overpowering it.
- Oreo crust. If you love a more chocolatey base, crushed Oreo cookies (without the cream) mixed with butter make a delicious alternative.
How to Make the Cheesecake Crust
- Crush the cookies or crackers. Use a food processor to blend graham crackers or Oreos into fine crumbs. If you don’t have a food processor, place them in a ziplock bag and crush them with a rolling pin.
- Mix with melted butter and sugar. The butter helps bind the crust, while a little sugar enhances the flavor. Stir everything until the crumbs are evenly coated.
- Press into the pan. Pour the crumb mixture into a springform pan and use the back of a spoon or a flat-bottomed glass to press it firmly into an even layer. Make sure to press slightly up the sides to create a well for the cheesecake filling.
- Chill or pre-bake. If you’re making a no-bake cheesecake, chill the crust in the refrigerator for at least 30 minutes to help it set. For a baked cheesecake, pre-baking the crust at 325°F (160°C) for about 8 to 10 minutes gives it a firmer texture and prevents sogginess.
Tips for a Perfect Cheesecake Crust
- Use room temperature butter to ensure even mixing.
- Press the crust firmly to avoid crumbling when slicing the cheesecake.
- If pre-baking, let the crust cool completely before adding the filling to prevent cracks.
With your crust ready, it’s time to move on to the creamy cheesecake filling.
Step 2 – Making the Creamy Cheesecake Filling
The heart of any great cheesecake is its smooth, creamy filling. A well-balanced cheesecake filling should be rich and velvety with just the right amount of sweetness. The key ingredients—cream cheese, eggs, sugar, and heavy cream—work together to create a luxurious texture that pairs beautifully with the tartness of the blackberries.

1. Softening and Beating the Cream Cheese
Start by bringing the cream cheese to room temperature. This step is crucial because softened cream cheese blends more smoothly, preventing lumps in the batter. Use a stand mixer or a handheld electric mixer to beat the cream cheese on medium speed for about two to three minutes until it becomes light and fluffy. Scrape down the sides of the bowl to ensure an even consistency.
2. Adding the Sugar and Eggs
Gradually add sugar to the beaten cream cheese, mixing until fully incorporated. The sugar not only sweetens the cheesecake but also helps break down the cream cheese further, ensuring a silky texture.
Next, add the eggs one at a time, beating on low speed after each addition. Mixing at a lower speed prevents too much air from being incorporated, which can lead to cracks during baking. Once all the eggs are mixed in, scrape the sides of the bowl again to ensure an even mixture.
3. Enhancing the Flavor
To enhance the cheesecake’s flavor, add vanilla extract and a bit of lemon zest. Vanilla provides warmth and depth, while lemon zest adds a subtle tanginess that complements the blackberries. If you prefer a more citrusy note, you can also add a teaspoon of fresh lemon juice.
4. Adding Heavy Cream for a Velvety Texture
Finally, gently fold in heavy cream or sour cream to give the filling an ultra-smooth, creamy consistency. Heavy cream adds richness, while sour cream provides a slight tang. If using sour cream, mix it in just until combined—overmixing can cause the cheesecake to become too dense.
Once the filling is ready, it should be thick, smooth, and free of lumps. It’s now time to pour it over the prepared crust and move on to the next step: baking and chilling the cheesecake to perfection.
Step 3 – Baking and Chilling the Cheesecake
After pouring your creamy cheesecake filling over the prepared crust, it’s time to move on to the baking and chilling process. This crucial step ensures your cheesecake has the perfect texture – rich and creamy with just the right amount of firmness. Whether you’re making a baked or no-bake cheesecake, the baking and chilling phases are essential for setting the filling and creating that indulgent mouthfeel. Here’s how to do it properly:

Baking the Cheesecake (for the baked version)
If you’re making a baked blackberry cheesecake, the oven plays a key role in achieving that silky smooth texture. Follow these steps carefully:
- Preheat your oven: Set your oven to 325°F (163°C) for a gentle bake. A lower temperature will prevent the cheesecake from cracking while ensuring even cooking.
- Water bath method (optional but recommended): To prevent cracks and ensure a smooth texture, bake the cheesecake using a water bath. Wrap the bottom of the springform pan with aluminum foil to prevent water from seeping in, and place the pan into a larger pan filled with about an inch of hot water. This method creates a moist environment in the oven that helps the cheesecake cook evenly and slowly.
- Baking time: Bake the cheesecake for 55 to 70 minutes, depending on your oven and the thickness of the filling. The cheesecake should be mostly set but still slightly wobbly in the center when done. Avoid overbaking, as this can lead to a dry texture.
- Let it cool in the oven: Once the cheesecake is done baking, turn off the oven and leave the door slightly ajar. Let the cheesecake cool slowly inside the oven for about 1 hour. This gradual cooling helps prevent the cheesecake from shrinking or cracking as it cools down.
Chilling the Cheesecake
After baking (or if you’re making the no-bake version), it’s time to chill the cheesecake. Proper chilling is essential to set the cheesecake to its perfect, creamy consistency.
- Cool at room temperature: Before transferring your cheesecake to the fridge, let it cool to room temperature for about 30 to 45 minutes. This prevents condensation from forming on the surface, which could affect the texture.
- Refrigerate: Once the cheesecake has cooled, cover it with plastic wrap or aluminum foil and refrigerate for at least 4 hours, but preferably overnight. The chilling process allows the flavors to meld together and helps the cheesecake firm up. The longer it chills, the better the texture will be.
- For no-bake cheesecakes: If you’re making a no-bake cheesecake, chilling is even more critical since the cheesecake is set without the aid of baking. After you’ve assembled the filling, make sure it chills for a minimum of 4 hours, but overnight is best for optimal texture.
By carefully following the steps for both baking and chilling, your blackberry cheesecake will come out with a smooth, creamy texture and beautiful structure. It’s all about patience and allowing the cheesecake to set properly. Once it’s perfectly baked and chilled, you’re ready to add your delicious blackberry topping and serve!
Step 4 – Preparing the Blackberry Topping
A rich, tangy blackberry topping is the crowning glory of any blackberry cheesecake. This step adds the perfect pop of color and a burst of fruity flavor that perfectly complements the creamy filling. Here’s how you can make the blackberry topping that will elevate your cheesecake to a whole new level.

Cooking the Blackberries
Start by placing fresh blackberries in a saucepan. Fresh blackberries are ideal because they have the best flavor and texture, but you can also use frozen blackberries if fresh ones are out of season. Add sugar to the pan to sweeten the berries, and stir gently to coat them. The sugar will help the blackberries release their juices, creating a syrup-like consistency.
Adding Lemon Zest for a Fresh Kick
To balance the sweetness of the blackberries, add a teaspoon of lemon zest. The zest gives the topping a refreshing citrus note that cuts through the richness of the cheesecake filling, enhancing the overall flavor.
Thickening the Topping
Next, dissolve cornstarch in a small amount of cold water (or a bit of blackberry juice if you prefer) and stir it into the blackberry mixture. This will help thicken the liquid, creating a syrup that’s the perfect consistency to spoon over your cheesecake. Let the mixture simmer on low heat for a few minutes until it thickens, but be careful not to overcook it – you want a smooth, pourable texture, not a jelly-like consistency.
Cooling Before Adding
Once the blackberry topping has thickened, remove the pan from the heat and let it cool completely. Pouring hot topping over a cold cheesecake can cause the filling to melt or lose its shape, so cooling is essential for the perfect presentation. If you prefer, you can also refrigerate the topping for a quicker cool-down.
Alternative: Fresh Blackberry Garnish
If you prefer a lighter, fresher approach, you can skip the cooking process and simply arrange fresh blackberries directly on top of the cheesecake before serving. This option is great if you’re short on time or want to keep the topping as natural as possible. Add a drizzle of honey or a light sprinkle of powdered sugar for an extra touch of sweetness, if desired.
Final Touches
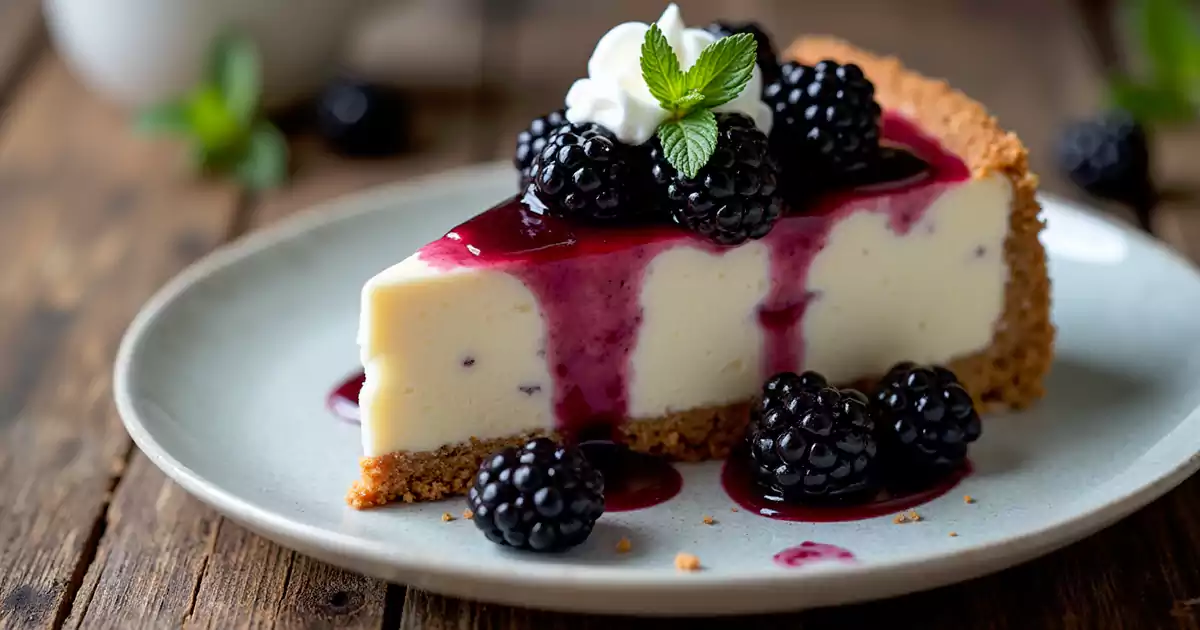
Once your blackberry topping is cool, spoon it over the cheesecake just before serving. Spread it evenly across the top, letting the juices drizzle down the sides for an elegant look. You can also garnish with mint leaves or whipped cream for added visual appeal. The combination of the smooth cheesecake and tangy topping will create a dessert that looks as amazing as it tastes.
Step 5 – Serving and Storing Your Blackberry Cheesecake
Once your blackberry cheesecake has chilled to perfection, it’s time to serve and store it. This step ensures that your cheesecake looks as good as it tastes and lasts as long as possible so you can enjoy it over several days. Let’s dive into the best ways to slice, serve, and preserve this delightful dessert.

How to Slice the Cheesecake Perfectly
Slicing a cheesecake can be tricky, but with the right technique, you’ll get beautiful, clean slices every time. Here’s how:
- Use a warm knife: Dip a sharp knife in hot water and wipe it dry before slicing each piece. This will help the blade glide through the creamy filling, giving you smooth, clean cuts.
- Chill before slicing: Make sure the cheesecake is fully chilled before serving. This helps the filling firm up, making it easier to cut.
- Cut slowly and carefully: For neat slices, use a gentle, sawing motion, rather than pressing down on the cheesecake. This will avoid any cracks or messy edges.
Garnishing Your Cheesecake
To make your cheesecake even more enticing, consider adding a few garnishes before serving. Here are some ideas:
- Fresh blackberries: Scatter some fresh berries on top for a burst of color and extra flavor.
- Mint leaves: A sprig of fresh mint can add a refreshing contrast to the rich cheesecake.
- Whipped cream: A dollop of freshly whipped cream adds a light, airy contrast to the creamy filling. You could even swirl in a little vanilla or lemon zest for extra flavor.
- Drizzle of sauce: If you have extra blackberry sauce, drizzle it over the top for a glossy, flavorful finish.
Storing Your Cheesecake
If you have leftovers (which is rare!), storing your cheesecake properly ensures it stays fresh and delicious. Here’s how:
- In the refrigerator: Wrap the cheesecake tightly in plastic wrap or store it in an airtight container. It can last up to 5-7 days in the fridge. Make sure the cheesecake is fully chilled before covering it to avoid condensation.
- Freezing for later: If you want to save your cheesecake for a later date, you can freeze individual slices or the entire cake. Wrap each slice in plastic wrap and foil, then place it in a freezer-safe container. It can be stored in the freezer for up to 2-3 months. To thaw, place the cheesecake in the fridge overnight.
- Freezing the topping: If you have leftover blackberry sauce or topping, store it in a small airtight container in the fridge for up to a week or freeze it for up to 3 months. This will keep the fresh berry flavor intact for future use.
By following these tips, your cheesecake will stay fresh, flavorful, and ready to impress for several days.
Conclusion
Making a blackberry cheesecake is a rewarding experience that brings together the perfect balance of creamy, tangy, and fruity flavors. Whether you choose the baked or no-bake version, following this step-by-step guide ensures you create a delicious dessert that’s sure to impress your family and friends.
From preparing the crust to the final blackberry topping, each step is designed to help you achieve the perfect cheesecake every time. Don’t forget to serve it with your favorite garnishes and store any leftovers properly for later enjoyment!
Try out this Blackberry Cheesecake and let your creativity shine! We’d love to see your sweet creations. Tag us on Instagram at @SweetEatsRecipes and use the hashtag #BlackberryCheesecake to get featured.
Blackberry Cheesecake
Equipment
- Springform pan
- Mixing bowls
- Electric mixer or hand whisk
- Knife (for slicing)
Ingredients
Crust:
- 1 ½ cups crushed graham crackers
- ¼ cup sugar
- ½ cup butter, melted
Filling:
- 2 cups cream cheese
- 1 cup sugar
- 3 large eggs
- 1 tsp vanilla extract
- 1 cup heavy cream
Topping:
- 1 ½ cups fresh blackberries
- ½ cup sugar
- 1 tbsp lemon zest
- 1 tbsp cornstarch
Instructions
- Prepare the crust: Mix graham cracker crumbs, sugar, and melted butter. Press the mixture into the base of a springform pan and bake at 350°F for 10 minutes.
- Make the cheesecake filling: Beat cream cheese and sugar together until smooth. Add eggs one at a time, followed by vanilla extract and heavy cream. Pour over the cooled crust.
- Bake the cheesecake: Bake at 350°F for 50-60 minutes or until set, then cool in the oven for an hour before transferring to the fridge for 4 hours.
- Prepare the topping: In a saucepan, cook blackberries, sugar, and lemon zest over medium heat until softened. Mix cornstarch with a little water, then add to the berries. Simmer until thickened. Let cool.
- Serve and store: Once chilled, top with blackberry sauce or fresh blackberries. Slice with a warm knife and enjoy. Store in the fridge for up to 5 days or freeze for longer storage.