If you love banana pudding and cheesecake, why not combine them into one irresistible dessert? This No-Bake Banana Pudding Cheesecake is the perfect blend of creamy, dreamy flavors with a buttery vanilla wafer crust. The best part? No oven required!
This easy, no-bake dessert is ideal for any occasion—whether you’re hosting a summer party, bringing a treat to a potluck, or simply craving something sweet. With a rich cheesecake filling, layers of banana pudding, and a touch of whipped cream, this recipe is guaranteed to be a crowd-pleaser.
In this post, I’ll walk you through everything you need to know to make the best no-bake banana pudding cheesecake, including step-by-step instructions, pro tips, and delicious variations. Let’s get started!
Why You’ll Love This No-Bake Banana Pudding Cheesecake

This No-Bake Banana Pudding Cheesecake is more than just a dessert—it’s a creamy, dreamy indulgence that combines the best of two classic favorites: banana pudding and cheesecake. If you’re looking for an easy-to-make, crowd-pleasing treat that doesn’t require turning on the oven, this recipe is for you! Here’s why you’ll love it:
1. Easy & No Oven Required
One of the best things about this recipe is that it’s completely no-bake! That means no need to preheat the oven or worry about complicated baking techniques. Simply mix, layer, and chill. This makes it an ideal dessert for warm-weather days when you don’t want to heat up your kitchen.
2. Creamy & Delicious Texture
This cheesecake is the perfect balance of smooth, velvety cream cheese filling and light, fluffy banana pudding. The addition of whipped cream makes it even airier, while the vanilla wafer crust adds a delicious crunch. Every bite is rich, luscious, and full of banana flavor.
3. Perfect for Any Occasion
Whether you’re hosting a family gathering, celebrating a special event, or simply treating yourself, this banana pudding cheesecake is a guaranteed hit. It’s great for:
- Summer BBQs and picnics
- Holiday dinners and potlucks
- Birthday parties
- A simple weeknight dessert
Since it’s a no-bake recipe, you can easily prepare it ahead of time, making it stress-free for entertaining.
4. Make-Ahead Friendly
This cheesecake actually tastes better the longer it chills, allowing the flavors to meld beautifully. You can prepare it the night before and let it set in the fridge for a minimum of 4 hours (or overnight) for the best results. This makes it a great make-ahead dessert that saves time when planning meals or events.
If you love easy, creamy, and utterly delicious desserts, this No-Bake Banana Pudding Cheesecake will quickly become one of your favorites. Let’s dive into the ingredients you’ll need to make this mouthwatering treat!
Ingredients You’ll Need
Before making this no-bake banana pudding cheesecake, it’s important to go over the key ingredients. Each one plays a role in creating a rich, creamy, and flavorful dessert.
1. Main Ingredients
These ingredients form the base of the cheesecake and provide its signature texture and taste.
- Cream cheese (16 oz, softened) gives the cheesecake a smooth and slightly tangy flavor. Full-fat cream cheese works best for a rich texture.
- Ripe bananas (2 to 3, mashed) add natural sweetness and a strong banana flavor. Using bananas with brown spots will ensure a sweeter taste.
- Vanilla wafers (2 cups, crushed) create a crunchy crust that complements the creamy filling. Graham crackers or Biscoff cookies can also be used as substitutes.
- Whipped cream (2 cups or 8 oz Cool Whip) adds lightness to the filling, making it airy and creamy. You can use homemade whipped cream or store-bought Cool Whip.
2. Sweeteners and Flavorings
These ingredients enhance the sweetness and aroma of the cheesecake.
- Sweetened condensed milk (1 can, 14 oz) provides richness, sweetness, and a velvety texture.
- Vanilla extract (1 teaspoon) enhances the overall flavor and pairs well with the banana.
- Powdered sugar (½ cup, optional) can be used to sweeten homemade whipped cream if you’re making it from scratch.
3. Thickening Agents
These help create a stable, no-bake cheesecake consistency.
- Instant vanilla pudding mix (1 package, 3.4 oz) thickens the filling while adding a mild vanilla flavor. Be sure to use the instant variety rather than cook-and-serve.
- Heavy cream (½ cup, optional) can be whipped to help create a firmer texture. If using Cool Whip, this step can be skipped.
4. Optional Toppings and Garnishes
These toppings add extra flavor and enhance the presentation.
- Sliced bananas provide a fresh banana taste and a decorative touch. Tossing them with a little lemon juice can help prevent browning.
- Caramel drizzle adds a sweet and rich finish that complements the banana flavor.
- Crushed vanilla wafers sprinkled on top give extra crunch and texture.
- Whipped cream can be piped or spread over the cheesecake for a more elegant look.
5. Ingredient Substitutions and Variations
For a gluten-free option, use gluten-free graham crackers or cookies instead of vanilla wafers. If making a dairy-free version, substitute the cream cheese with a dairy-free alternative, use coconut whipped cream, and choose an almond milk-based pudding mix. To add a chocolate twist, consider layering the cheesecake with chocolate ganache or using chocolate graham crackers for the crust.
Having these ingredients ready will make assembling the no-bake banana pudding cheesecake much easier. Now, let’s move on to the step-by-step instructions.
Step-by-Step Guide to Making No-Bake Banana Pudding Cheesecake
Making this No-Bake Banana Pudding Cheesecake is easier than you think! With just a few simple steps, you’ll have a creamy, flavorful dessert that will impress your family and friends. Follow this detailed guide to ensure a perfect cheesecake every time.
Step 1: Prepare the Crust
The crust is the base of your cheesecake and adds a delicious crunch to complement the creamy filling.
- Crush the Vanilla Wafers – Use a food processor or place the wafers in a ziplock bag and crush them with a rolling pin until you have fine crumbs.
- Mix with Melted Butter – In a mixing bowl, combine the crushed wafers with melted butter. Mix thoroughly until the crumbs are uniformly coated, achieving a texture similar to damp sand.
- Press into the Pan – Transfer the mixture into a 9-inch springform pan and press firmly into the bottom using the back of a spoon or a flat-bottomed glass. This will help create a firm crust that holds together.
- Chill the Crust – Place the pan in the refrigerator while you prepare the filling. Chilling helps the crust set and prevents it from becoming soggy.
Step 2: Make the Cheesecake Filling
This is where the magic happens! The filling is a rich blend of cheesecake and banana pudding, creating a smooth, velvety texture.
- Beat the Cream Cheese – In a large mixing bowl, beat softened cream cheese with an electric mixer until smooth and creamy. This step ensures there are no lumps in the filling.
- Add Sweetened Condensed Milk – Slowly pour in the condensed milk while mixing to create a sweet, silky texture.
- Mix in Banana Pudding – Prepare instant banana pudding according to package instructions (using cold milk) and fold it into the cream cheese mixture. This adds a delicious banana flavor.
- Fold in Whipped Topping – Gently fold in whipped topping (like Cool Whip) to create a light, airy consistency. Be careful not to overmix, as this can cause the filling to deflate.
Step 3: Assemble the Cheesecake
Now it’s time to bring everything together!
- Layer the Sliced Bananas – Arrange a layer of banana slices on top of the chilled crust for an extra burst of banana flavor.
- Pour the Cheesecake Filling – Spread the prepared cheesecake mixture evenly over the crust and bananas, smoothing out the top with a spatula.
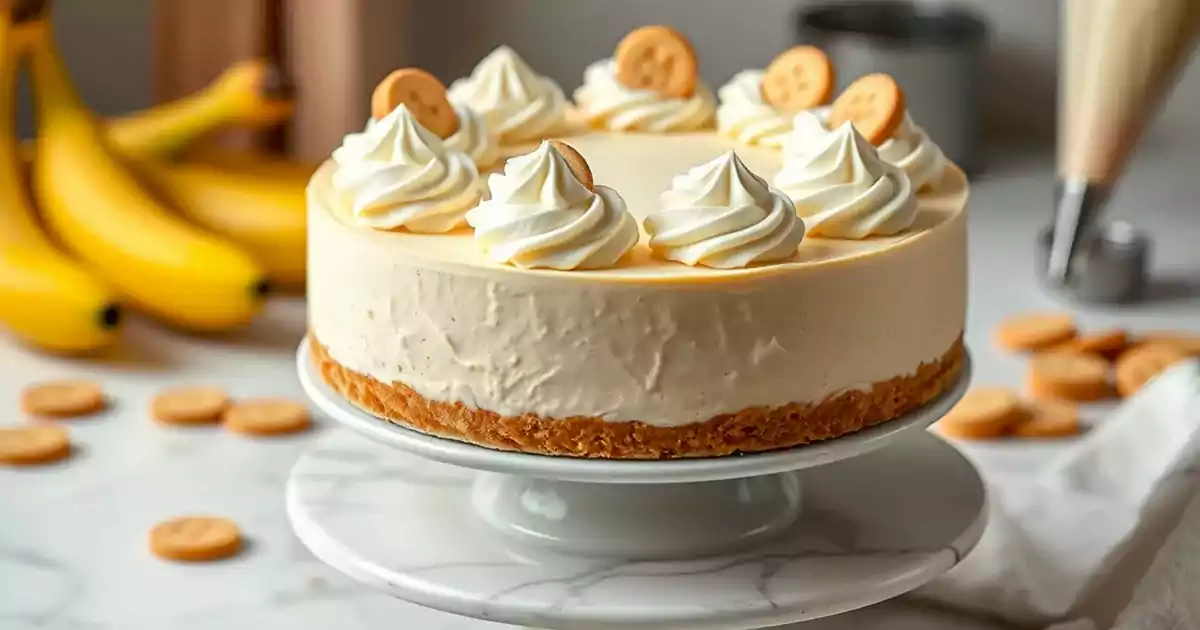
- Add a Final Layer of Toppings – You can add an extra layer of whipped topping, more banana slices, and crushed vanilla wafers for decoration.
Step 4: Chill & Serve
To achieve the best texture and flavor, patience is key!
- Refrigerate for at Least 4 Hours – Cover the cheesecake with plastic wrap and let it chill in the refrigerator for at least 4 hours, or overnight for best results. This allows the filling to firm up and develop its flavors.
- Carefully Remove from the Pan – Once set, run a knife around the edges of the springform pan before releasing the sides to ensure a clean removal.
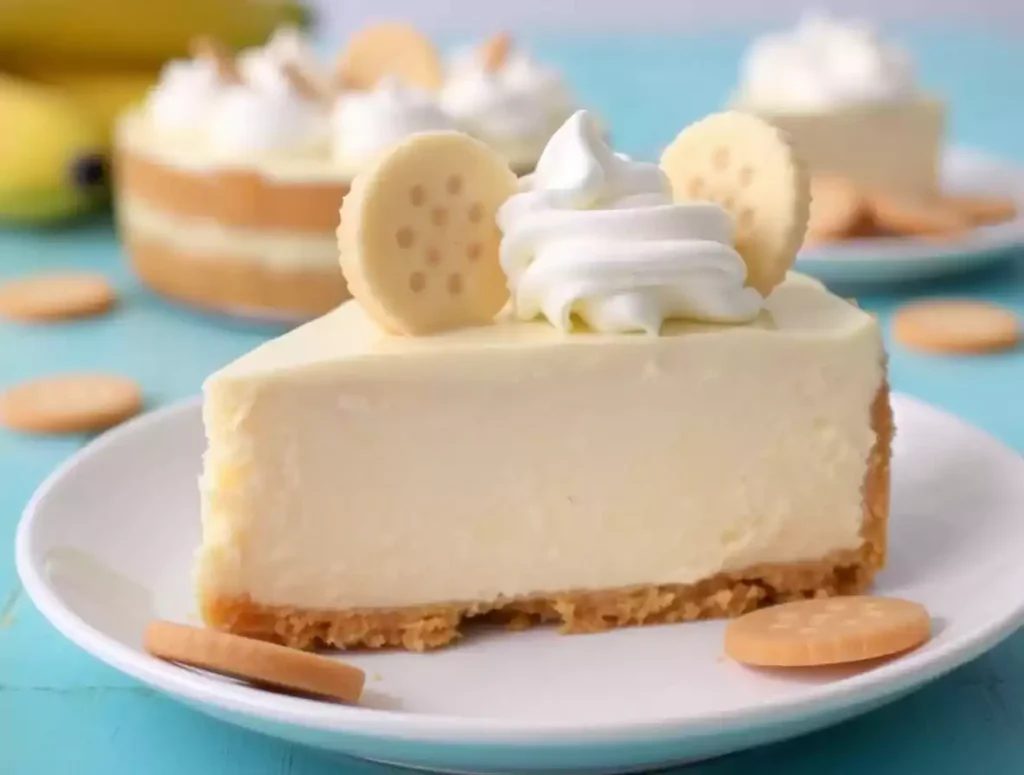
- Slice and Enjoy! – Serve chilled and garnish with extra whipped cream, banana slices, and a drizzle of caramel or chocolate sauce for a beautiful finishing touch.
By following these simple steps, you’ll have a decadent No-Bake Banana Pudding Cheesecake that’s creamy, flavorful, and guaranteed to impress. Prepare to savor every delicious bite and indulge in the flavors!

Pro Tips & Variations for the Best Cheesecake
Making a no-bake banana pudding cheesecake is already simple, but with a few extra tips and creative variations, you can make it even better. Whether you want to enhance the texture, avoid common mistakes, or try new flavor combinations, these tips will help you create the perfect cheesecake every time.
How to Keep Bananas from Browning
Bananas brown rapidly when left exposed to the air. To keep them looking fresh and appetizing, try brushing or tossing the slices with lemon juice. Pineapple juice can also be used for a slightly sweeter alternative. If you are adding banana slices as a topping, do so just before serving to keep them bright yellow. When storing leftovers, press plastic wrap directly against the surface of the cheesecake to minimize air exposure.
Substitutes for Nilla Wafers
Nilla Wafers are a classic choice for the crust, but there are many alternatives. Graham crackers provide a slightly more neutral flavor, while Biscoff cookies add a caramelized, spiced taste that pairs well with bananas. Golden Oreos bring a sweeter vanilla flavor, and shortbread cookies create a rich, buttery base.
Making It Even Creamier
For a lighter and fluffier cheesecake, whip the heavy cream to stiff peaks before folding it into the filling. This adds extra airiness to the texture. Using room-temperature cream cheese ensures a smoother blend without lumps. Adding a little extra pudding mix helps thicken and stabilize the filling while making it even creamier.
Fun Flavor Variations
There are many ways to change up this cheesecake for different flavors. A chocolate banana cheesecake can be made by adding a layer of chocolate ganache or mixing cocoa powder into the crust. A peanut butter banana cheesecake can be created by swirling in melted peanut butter. Caramel banana cheesecake can be enhanced with a drizzle of caramel sauce. A strawberry banana cheesecake can be made by adding sliced strawberries between the layers, and an Oreo banana cheesecake can include crushed Oreos in the crust and filling.
How to Make a Gluten-Free Version
For a gluten-free version, substitute the vanilla wafers with gluten-free graham crackers or gluten-free vanilla wafers. It is also important to check that the pudding mix and other ingredients are certified gluten-free. The rest of the recipe remains the same, making it easy to enjoy a delicious cheesecake without any gluten concerns.
These tips and variations allow you to customize your no-bake banana pudding cheesecake to suit any taste preference. Whether sticking with the classic version or experimenting with new flavors, this dessert is sure to be a hit.
Storing & Serving Suggestions

Once you’ve made this delicious no-bake banana pudding cheesecake, you’ll want to store it properly to keep it fresh and flavorful. Whether you’re making it ahead of time for a party or saving leftovers, here’s how to ensure the best taste and texture.
How to Store No-Bake Banana Pudding Cheesecake
To keep your cheesecake fresh and delicious:
- Refrigerate the cheesecake in an airtight container or cover it tightly with plastic wrap. It will stay fresh for up to three days in the refrigerator.
- If you’ve garnished the cheesecake with banana slices, brush them lightly with lemon juice or pineapple juice to slow oxidation and prevent them from turning brown.
- Since this is a no-bake dessert, the crust can soften over time. To maintain a firmer texture, store the cheesecake on a flat surface and avoid excess moisture exposure.
Can You Freeze No-Bake Banana Pudding Cheesecake?
Freezing this cheesecake is a great option if you want to make it in advance. Here’s how to do it properly:
- To freeze the whole cheesecake, wrap it tightly in plastic wrap, then in aluminum foil, and store it in an airtight container. You can store it in the freezer for up to two months without compromising its quality.
- If you prefer to freeze individual slices, wrap each slice in plastic wrap and place them in a freezer-safe bag or container for easy serving later.
- When ready to serve, transfer the cheesecake to the refrigerator and let it thaw overnight. Avoid thawing at room temperature, as this may cause the texture to become too soft.
Best Ways to Serve No-Bake Banana Pudding Cheesecake
This cheesecake is already packed with creamy banana flavor, but adding the right toppings and presentation can make it even better.
- Top with fresh banana slices, crushed vanilla wafers, and a dollop of whipped cream.
- Add a drizzle of caramel sauce or melted white chocolate for extra indulgence.
- Sprinkle chopped nuts, such as toasted pecans or walnuts, on top for added texture.
- Serve in individual jars for a portable, party-friendly dessert.
When to Serve This Cheesecake
This no-bake banana pudding cheesecake is perfect for summer barbecues and picnics, holiday gatherings, potlucks, and weekend treats. Since it requires no baking, it’s especially great for warm-weather occasions when you want a cool and refreshing dessert.
By storing and serving your cheesecake properly, you’ll ensure that every bite is just as delicious as the first.
Conclusion
This no-bake banana pudding cheesecake is the perfect dessert for any occasion. With its creamy texture, rich banana flavor, and easy preparation, it’s a treat that will impress family and friends without the hassle of baking. Whether you’re making it for a party, a holiday gathering, or just because you’re craving something sweet, this recipe is sure to become a favorite.
Try out this No-Bake Banana Pudding Cheesecake and let your creativity shine! We’d love to see your sweet creations. Tag us on Instagram at @SweetEatsRecipes and use the hashtag #NoBakeBananaPuddingCheesecake to get featured.
No-Bake Banana Pudding Cheesecake
Ingredients
For the Crust:
- 1 ½ cups vanilla wafer crumbs
- ¼ cup melted butter
For the Cheesecake Filling:
- 2 ripe bananas, mashed
- 16 oz cream cheese, softened
- ½ cup sweetened condensed milk
- 1 package (3.4 oz) instant vanilla pudding mix
- 1 teaspoon vanilla extract
- 1 cup heavy whipping cream, whipped
For Topping:
- Sliced bananas
- Whipped cream
- Crushed vanilla wafers
- Caramel drizzle (optional)
Instructions
- Prepare the Crust: Crush vanilla wafers and mix with melted butter. Press the mixture into the bottom of a springform pan and chill in the refrigerator.
- Make the Cheesecake Filling: In a mixing bowl, beat cream cheese until smooth. Add mashed bananas, sweetened condensed milk, vanilla pudding mix, and vanilla extract. Mix until fully combined.
- Fold in Whipped Cream: Gently fold in the whipped cream to create a light, fluffy texture.
- Assemble the Cheesecake: Pour the filling over the crust and smooth the top with a spatula.
- Chill and Set: Refrigerate for at least 4 hours, or until firm.
- Garnish and Serve: Before serving, top with sliced bananas, whipped cream, and crushed vanilla wafers. Drizzle with caramel if desired.
Notes
- To prevent bananas from browning, brush them lightly with lemon juice before placing them on the cheesecake.
- This cheesecake can be made a day in advance and stored in the refrigerator.
- To make it gluten-free, use gluten-free vanilla wafers for the crust.